Outlook Express Backup Express
A step-by-step description of the process of creating a backup copy of your emails, identities, and accounts, including all passwords, in Outlook Express:
- Download, install and run Outlook Express Backup Toolbox from here: https://recoverytoolbox.com/download/OutlookExpressBackupToolboxInstall.exe
- Select the desired action:
- Click on the Backup button if you want to make a backup copy.
- Click on the Restore button if you want to restore the data from a backup.
- If backups are made, you need to select the following items on the second screen of the program: Identity, Account Settings, Mail Folders, Signatures, Messages Rules, Address Book, and other data to be backed up.
- Select the location on the disk and the name of the backup file.
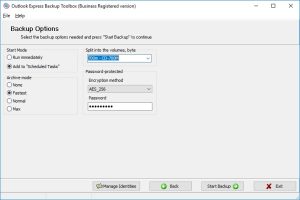
- Select the backup options:
- Start time;
- Archiving mode;
- Splitting the file into volumes;
- Encryption method and password.
-
- If you are restoring from a backup, you must select the recovery mode on the second page of the program:
- Simple Restore provides simple as is data recovery.
- Advanced Restore allows you to configure particular restoration options.
- Select the file that you previously backed up to.
- Select the data to be restored.
- Choose where to restore each Profile.
- Click Start Restore.
Nowadays e-mail is one of the main channels of information exchange not only for companies, but also for individuals. That is why you can come across very important messages, including those with all kinds of attached documents, in correspondence. Of course, losing them may do a lot of harm. Nevertheless, a lot of things may cause it, from virus attacks to incorrect actions performed by the user. That is why backing up e-mail is a very important issue.
Outlook Express is one of the most popular mail clients at the moment. Its popularity is attributed to the fact that it is included in the distribution package of all Windows operating systems starting from version 95 OSR2. It is absent from Windows Vista and later in Windows 7 where another mail client is used – Microsoft Mail. So, users quite often encounter the problem of backing up information from Outlook Express. You can solve it with Outlook Express Backup Toolbox. Let us see this process in detail.
Now you can get down to the backup configuration that is implemented as a convenient step-by-step wizard. To start the process, click the Backup button.
In the first step, you should specify the information that will be backed up. A tree with all existing identities (they contain all account settings, folders with correspondence, signatures and message rules) and general information (address book, stationery) is used for that. You can use checkboxes next to each section to select the data that should be backed up. You can select whole branches corresponding to identities or you can expand them and select separate parts: settings, folders with correspondence, signatures and message rules.
The next step comes down to selecting the file the backup copy will be saved to. You can manually type its name together with the full path to it. However, it is more comfortable to use Windows Explorer opened with a click on the
 button. By the way, you should seriously consider the name of the file where the backup copy will be stored. It is advisable to specify creation date and time in it. It will allow you to avoid being confused afterwards and quickly find in your backup copies what you need. It is interesting that Outlook Express Backup Toolbox helps you with that by automatically adding the current date to the file name.
Then you should configure additional backup parameters. First of all, it is compression rate. It is specified with the help of the Archive mode radio buttons. There are 4 options available: None, Fast, Normal and Max. The more the compression rate is, the less space the backup will occupy, but the longer the information will be backed up and restored. If necessary, you can protect the backup copy against unauthorized access. To do it, you should select one of the four available encryption methods in the Encryption Method drop-down list (the classic PkZip protection or the AES algorithm with the 128, 196 or 256-bit key length) and type the access password in the Password field.
The next parameter that you should specify is splitting the backup into volumes. It is specified in the Split to the volumes field. It is empty by default. It means that all information will be saved to one backup file. If you are going to store the backup copy on removable media, you can select the appropriate option in the drop-down list: ZIP-100, CD-650 MB, etc. In this case, the program will automatically split the backup into volumes fitting onto the corresponding media. If necessary, you can type the size of these volumes manually (in bytes).
Specifying the way the task should be started is the last operation in this step. The Start Mode radio buttons are used for that. The Run Immediately option is selected by default. But since you need to configure automatic backup, select the Add to Scheduled Task option. A scheduled Windows task will be created in this case. This approach allows you to automatically start the backup process according to schedule and ensure constant secure protection for your e-mail correspondence.
When you move on to the next step, the standard Windows New Task dialog box will appear. Its main fields will be already specified. The only thing you have to do is enter the login and password of the account under which the backup process will be started and specify the schedule: daily, weekly, monthly, when the computer is switched off, etc. One task can have several schedules, which allows you to implement a flexible information backup policy. After you save the scheduled task, it appears in the corresponding Windows folder (Start|All Programs|Accessories|System Tools|Scheduled Tasks). You can edit it afterwards, for example, change the schedule.
Now the backup configuration process can be considered complete. However, note that no backup has been created (it is created automatically according to schedule). If you need it immediately, you should leave the Run Immediately option selected. When you move one to the next step in this case, the program will ask you the following question: Do you wish to start backup process? You only have to confirm your wish and wait till the backup process is complete. The time it will take depends on the amount of the source information and the available system resources of the computer.
Information is restored from a previously created backup copy with the help of a step-by-step wizard as well. To start it, you should click the Restore button after starting Outlook Express Backup Toolbox. After that the program will offer you to choose one of the two methods for restoring information: Simple Restore and Advanced Restore. The difference between them comes down to the following: if you use the first method, all data stored in the backup is restored, while the second method allows you to select the necessary information and also restore it not into source, but new identity. You select the backup file in the next step. You can type its name and the full path to it manually. But of course it is better to use Windows Explorer opened with the
button.If the first method is selected and you move on to the next step, the program will show the warning that all data currently existing in Outlook Express will be deleted and ask whether you want to copy the data. If you answer yes, the restoring process starts.
If you select the advanced method, you will be offered to specify the necessary data after the backup copy is selected: identities (account settings, folders with correspondence, signatures, message rules) and general information (address book, stationery). You can do it with the help of the tree already mentioned above. The only difference will be that it contains not the information currently existing in Outlook Express, but data from the backup. You should select the identity the information will be restored to. By default, the account that was backed up is selected in the Destination drop-down list. However, you can restore the data to a new identity if necessary. To do it, just select the New Identity item in the drop-down list and enter the name of the identity you want to create. This approach allows you to restore all information keeping the currently existing data.
After that start the process. Its duration depends on several factors, mainly on the amount on information and the available system resources of the computer. Note that you should close Outlook Express before you start copying the data. Otherwise errors will occur during the process and it will be completed incorrectly.
Thus, Outlook Express Backup Toolbox is a great tool for backing up the entire information from the Outlook Express mail client. It possesses all features necessary to solve this problem with high quality. It should also be mentioned how easy it is to use the program. Anyone can use it to back up data, even if the user is only learning how to work with the computer.
Identity Manager
The so-called Identity Manager is an additional feature available in Outlook Express Backup Toolbox. It is a special module that can be used to manage Outlook Express identities, which allows you to configure this mail client for being used by several users. You can start the Identity Manager with the button. Its list contains all currently existing accounts. You can do anything with it: Copy identities, Edit them, Delete them and also create New identities.
- If you are restoring from a backup, you must select the recovery mode on the second page of the program:
- Firstly, you will be required to create a folder on your hard drive to store the messages. You can call this whatever you would like, but we would recommend something easily identifiable such as ‘OEBackup’, or similar, and saving it to the Desktop.
- Now you will need to confirm where Outlook Express stores your messages currently. To do so, open up Outlook Express.
- From the Tools menu, select Options.
- From the Options Menu, navigate to the Maintenance Tab and click Store Folder.
How To Install?
Run the system and open PC properties.Get the latest Software.
Go to the activation menu too.
After that, download the code and the crack from the link below.
Enter this key to activate.